
If you bought any bitcoin recently, you likely used a mainstream exchange like Coinbase, Kraken, or Gemini, to name just a few. And if your bitcoin wallet (the file that stores your access codes) lives on the exchange where you bought the coins, you are entrusting the security of your coins to that exchange site.
That can be risky. Even Coinbase, the most mainstream brokerage for buying bitcoin, now with more than 13 million customers, is vulnerable. If someone obtains both your Coinbase password and your phone or phone number, they can take over your account and steal your coins by sending them elsewhere.
What’s a hardware wallet?
The best practice for keeping your coins safe is to move them offline. That practice is called “cold storage,” because you keep your access keys to your coins somewhere not accessible to an internet connection (i.e. not “hot”).
One popular cold storage option is to move the coins onto a “hardware wallet.” These are physical devices that carry encryption and exist purely to store your wallet file. Your coins are far safer from theft if stored offline.
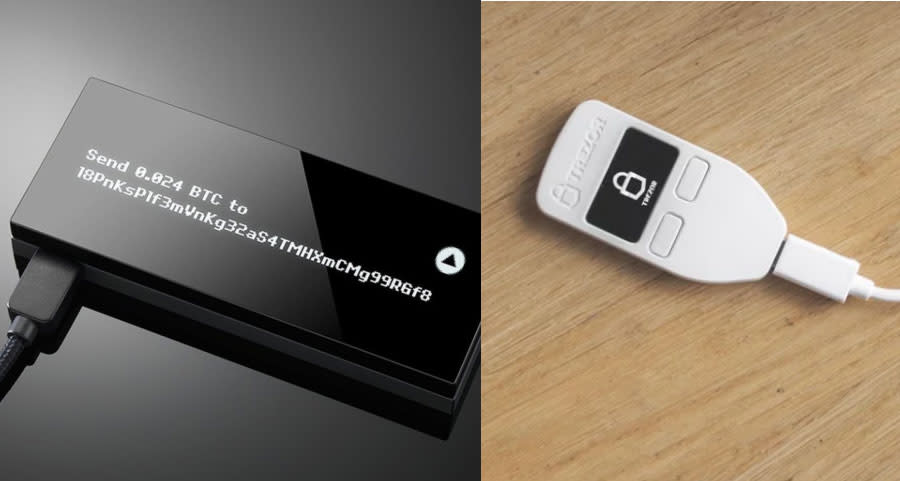
There are a number of hardware wallets on the market these days; some of the best known are KeepKey ($130), Trezor ($106), and Ledger ($68). Each device looks a little different, but they all connect to your computer via the USB port, using a cord. (Ledger resembles an actual USB stick, though it doesn’t plug directly into your computer.)
How do I send coins from Coinbase to a hardware wallet?
So, how do these work? As a demo, we tried one out, the Ledger Nano S. It’s simple, relatively quick, and requires no advanced technical understanding.
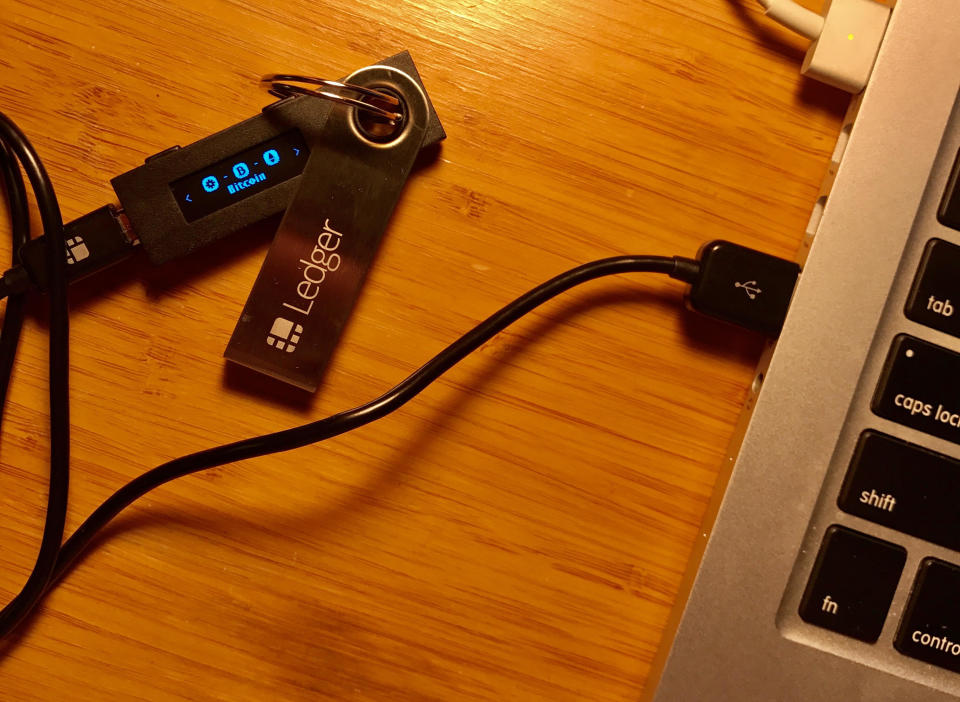
When you first plug in the Ledger Nano S, its screen welcomes you in neon blue text and explains how the only two buttons on the device work: click left or right to move back or forward through menus, and click both at the same time to confirm a menu selection.
Then it asks you to choose a four-digit passcode. This passcode is only for use on the physical device, but the device will prompt you for it every time you plug in, and every time you re-open the Ledger screen on your computer, too.
Next, Ledger displays for you a 24-word recovery phrase and encourages you to write it down (offline!) and store it somewhere safe. Ledger comes with a custom card for writing down your recovery phrase, but you don’t have to use that—wherever you write down the words, the key is not to lose it. This is really important: if you ever lose the physical Ledger device, you can still access your coins if you have our 24-word recovery phrase. After you confirm you’ve written down your recovery phrase, Ledger will then test you to make sure you have your phrase down, by asking you to select, for example, the ninth word from your recovery phrase.
Now you’re ready to set up your actual wallet file. First you’ll download a free web extension (the other hardware wallets work the same way) and when you have the Ledger plugged in and open the web app, you can create a wallet file for either Bitcoin or Ethereum. (KeepKey supports bitcoin, ether, litecoin, dogecoin, dash, and namecoin; Trezor supports bitcoin, ether, litecoin, dash, and Zcash.) The Ledger web app screen won’t even display anything unless your Ledger device is plugged in and you’ve entered your passcode on the device.
Once you’ve created a wallet, you have a wallet address that you can view. (It’s a good idea to write that down too, somewhere safe.) Now you can receive funds at that address. (Note: hardware wallets are strictly for storing your coins; they are not buying platforms. You can’t buy new bitcoins with your Ledger device.)
This is where Coinbase (or whatever exchange you’ve used to buy coins) comes in. Log in to your account at Coinbase and click on accounts, then click “send” on the wallet that houses the funds you want to send. Here, you can type in your Ledger wallet address.
Be warned: Coinbase will charge you a network fee to send funds off Coinbase, and the fee varies based on activity on the bitcoin blockchain. The fee is typically around 1.5% of the amount you’re sending, but can balloon during high trading activity; on the day we sent $100 worth of bitcoin from Coinbase to a Ledger wallet, the Coinbase fee was $15, or 15%. Yes, that’s very high. (Here’s what Coinbase says on its site about its fees; the language is vague.) Coinbase always shows you what the transaction fee will be before you click the button and confirm the transaction. And it will require you to type in your Coinbase authentication code, which comes from an authenticator app on your phone such as Google Authenticator or Duo Mobile.

Once you confirm, Coinbase shows you a pleasant green check mark and gives you the details of the transaction: which address you sent from, which address you sent to, how much you sent, and how much you paid in fees. It also emails you this info.
It’s that easy. The funds take some time to clear—in our case, Ledger did not reflect the new balance until four hours later. But once your coins are on the hardware wallet, they’re much safer.
To review, we had to have or know all these things to transfer funds from Coinbase to the hardware wallet: the wallet device itself; passcode to the device; Ledger wallet address; Coinbase log-in credentials; Coinbase authentication code from a phone.
That’s a lot of security hurdles, which should help you feel sure that your coins are safe from theft.
Disclosure: The author owns less than 1 bitcoin, purchased in 2015 for reporting purposes.
—
Daniel Roberts covers bitcoin and blockchain at Yahoo Finance. Follow him on Twitter at @readDanwrite.
Read more:
If you bought bitcoin, you must understand ‘cold storage’
Why Nasdaq, CME, and CBOE are all rushing in to bitcoin futures
The 11 biggest names in crypto right now
Square’s bitcoin trial is a big deal
